
The process of screen printing can effectively be divided into two phases: the graphic design phase and the printing phase. Does it make sense to buy all the equipment so as to be able to take care of everything yourself? From A to Z, here’s a run-down of the advantages and limitations of carrying out the process in-house.
- In this article:
- The two main aspects of screen printing: pre-printing and printing
- Pre-printing: here’s everything you need
- Don’t forget the fundamental rule of screen printing: one colour, one file, one frame
- The printing phase: an entirely different story
In screen printing there’s one cast-iron certainty: its fundamentals change very little over time. Of course, we now have digital techniques and attempts are being made to introduce machinery that should simplify the frame preparation and printing process, but the reality is that the classic system, over time, is the only one that’s remained truly reliable and affordable.
This doesn’t mean that the technique of screen printing doesn’t involve innovative technologies, far from it, but it does offer long term stability that makes it possible, over time, to recoup the initial investment and, above all, to acquire the necessary skills.
It’s for this reason that it’s a good idea to set up a home-based screen printing workshop, rather than to use external providers: the equipment lasts for a long time, even after ten or fifteen years a screen printing press will still work perfectly well, as will all the other tools you need for screenprinting.
However, before starting out, it’s worth thinking about whether it really makes sense – and whether it’s the best option from a financial standpoint – to set up a workshop that can handle every single step in the screen printing process.
The two main aspects of screen printing: pre-printing and printing
Indeed, we can divide the screen printing workshop into two large areas, each dedicated to one of the two phases:
– pre-printing, i.e. the phase during which the graphic design is prepared, the film is printed, the frame is stretched and, finally, the frame is exposed.
– printing: once the frame has been prepared, you can print using different types of printing stations and accessories (oven, heat press, etc.).
In a standard workshop – where the machines used for printing aren’t particularly complex or expensive – the investment in terms of money and how much you need to learn usually breaks down as follows: 60% pre-printing, 40% printing.
Generally, therefore, we tend to advise against setting up a workshop that also encompasses the entire pre-printing phase: it’s the most expensive part and there’s a risk of buying equipment that can rapidly become obsolete. Unless… well… let’s see.
Pre-printing: here’s everything you need
Pre-printing is when you start from a design that you’ve created, or that was provided to you by a customer (if you print for others). To transfer this design onto the frame, there are a series of intermediate steps that need to be undertaken to ensure the printing is successful: this is effectively the essence of pre-printing.
Firstly, the design must be transformed into a file that can be screen printed.
You can find some detailed articles in our blog: it needs to have specific characteristics regarding the black and the halftones that are used for the shading. Clearly, if it’s a multi-colour design, each colour needs to be separated from the others and printed on a different film.
Don’t forget the fundamental rule of screen printing: one colour, one file, one frame
The tools and equipment required for this phase are: a modern computer, a graphics programme such as Adobe Photoshop or Adobe Illustrator, an inkjet printer that’s been correctly set up, possibly an RIP for the printing and some suitable screen printing film.
The majority of the tools and equipment needed for this phase are digital and computer-based, therefore they become obsolete quickly, annual subscriptions may be required, and the components are consumed at a high rate. In short, their cost is only justified, i.e. repaid, if they’re used frequently.
- In parallel, i.e. also during the pre-printing phase, you’ll need to build the frame. This is what you need:
- a tool for stretching the frame, or alternatively a series of clamps (manual or pneumatic) which need to be positioned one by one around the frame. For obvious reasons, we advise against employing more “DIY” methods, such as using staples to fix the mesh to the frame. It’s also important to use the correct glue: usually a very strong bicomponent glue.
- once stretched, the screen needs to be emulsified – using emulsion and a scoop coater – and left to dry in a dark, warm oven.
- then, once the emulsion is dry, you can secure the film to the frame and put the whole thing in an exposure unit with white or UV light.
- now you need a washout booth: this is where you develop the frame using a strong jet of water. The washout booth needs to be connected to a water recirculation and cleaning system: the water, once it’s been mixed with the emulsion, cannot be discharged into the sewage system.
This is all part of the pre-printing phase: it’s fascinating to watch, interesting to learn, but it’s very difficult to do. To obtain great results you need experience and, above all, expensive equipment.
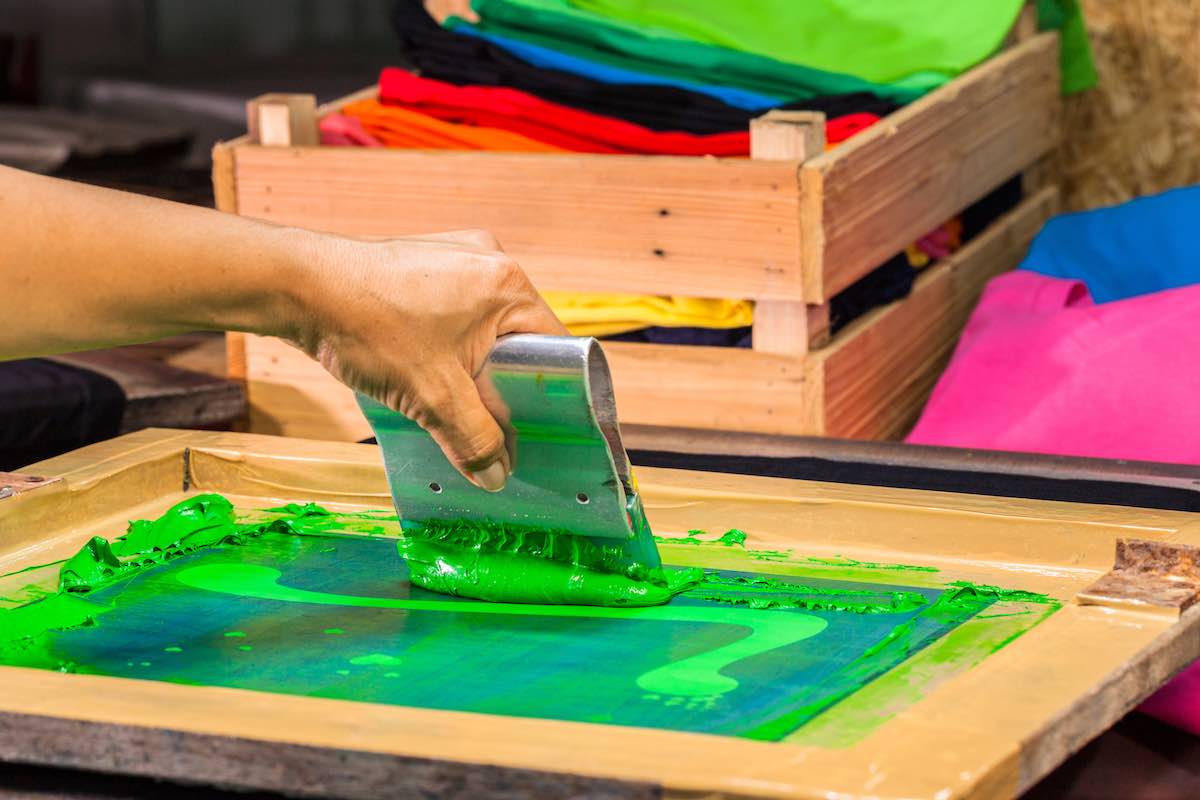
The printing phase: an entirely different story
Of course, the printing phase also requires a lot of experience, but you can start small and grow over time.
For example, you can start with a single-colour manual press or a modular carousel with a single printing station, to which you’ll be able to add other stations later.
Here you can find a list of screenprinting workshop accessories, whilst regarding consumables, the choice of inks depends on your design, the object you’re printing on and the equipment you have in your workshop.
The area of your workshop that’s dedicated to printing can be supplemented with various additional items of equipment: an oven, a heat press, racks, a flash dryer, etc.
But the great thing is that all this can be gradually done over time, and as you become more experienced you’ll understand what you need most to meet your specific printing objectives.
To conclude, for a screen printer looking to set up his/her workshop, the best approach is as follows:
first, learn how to screen print and equip yourself accordingly then, once you’ve got to that point, you can start looking into carrying out the pre-printing and frame preparation phase yourself.
In the meantime, there are lots of companies that can take care of preparing the frames from your graphic design files: CPL Fabbrika exposes thousands of screens every year, our graphics department is ready to help you choose the ideal size and mesh for your needs. It’s the quickest and cheapest way and it can help you get started in the world of screen printing.
- In summary:
- divide the process into two phases: pre-printing and printing
- consider if you’d like to purchase the equipment needed for both phases or just for one
- use an external provider for preparing your frame and purchase the equipment needed for the pre-printing phase only after you’ve gained some experience.
Visit CPL Fabbrika.com
you’ll find all the product for your screenprinting project!