

In reality, there aren’t any hard and fast calculation methods for determining a screen’s perfect exposure time. It basically comes down to trial and error and lots of experience. However, there are a few little tricks that can help you get this stage right.
- In this article:
- When do we expose screen printing screens to light?
- Calculating the correct screen exposure time
- A must-have accessory: an exposure calculator
- How to use an exposure calculator
- Conclusions and final tips
And so we come to one of the great dilemmas in screen printing: how long should the screen be exposed to light for? Is there a cast-iron answer that means not throwing away loads of materials and wasting lots of time?
There aren’t any calculations or formulas that can provide a definite answer to this question, but there are a number of variables that we can manage in order to minimize the errors. Experience plays a key role here, and working empirically doesn’t necessarily mean working randomly.
There are a number of variables that we can manage and, when carrying out our tests, it’s important to adjust these variables one at a time, otherwise we won’t understand which of them led to a certain result. Furthermore, if you make a note of each variation and the result, you’ll create your own “instruction manual” to guide you through your future work.
But to make sure we create a complete picture, let’s start from the beginning.
When do we expose screen printing screens to light?
When should a screenprinting screen be “exposed” to light?
- In screen printing, the pre-printing stage is effectively composed of two steps:
- the graphics team creates the file and produces the screen printing film
- then, in the workshop, the screen is produced by gluing on the mesh (here are the different types of mesh), the thread count of which should be chosen on the basis of the design and the type of ink being used. It’s attached to a wooden or metal frame.
Once the screen has been created, you’ll need to prepare it using an emulsion (sometimes called gel) that’s suitable for the type of light you’ll be using during exposure.
>> Here you’ll find some suggestions on which type of emulsion to use for the different types of light.
Finally, allow the emulsified screen to dry, apply the film, and then move on to the exposure phase.
The equipment needed for this step is an exposure unit.
Calculating the correct screen exposure time
- During the exposure, we need to consider the following variables:
- the type of emulsion and its thickness
- the thread count of the mesh (and, to a lesser extent, the colour of the mesh: white or yellow)
- the type of light: white or UV
- the distance between the light source and the screen inside the exposure unit
- the characteristics of the design and the opacity of the black on the film: we always recommend working with films that have been printed perfectly, i.e. with opaque black.
To calculate the exposure time required to ensure a perfect print, the best thing to do is to carry out some tests so that you’ll know how best to do it during the production phase. Getting and utilising the test feedback.
If you’ve exposed the screen-printing screen for too long
This will be the case if the design doesn’t appear or the lines aren’t visible.
Try halving the exposure time and see how your print looks then. Then continue to adjust the time so as to arrive at the perfect exposure time.
If you’ve exposed the screen-printing screen for an insufficient amount of time
The emulsion melts: this is what most typically happens when the exposure time is too short. In this case double the exposure time and test again.
Visit CPL Fabbrika.com
the first in Europe that specializes in screen printing
A must-have accessory: an exposure calculator
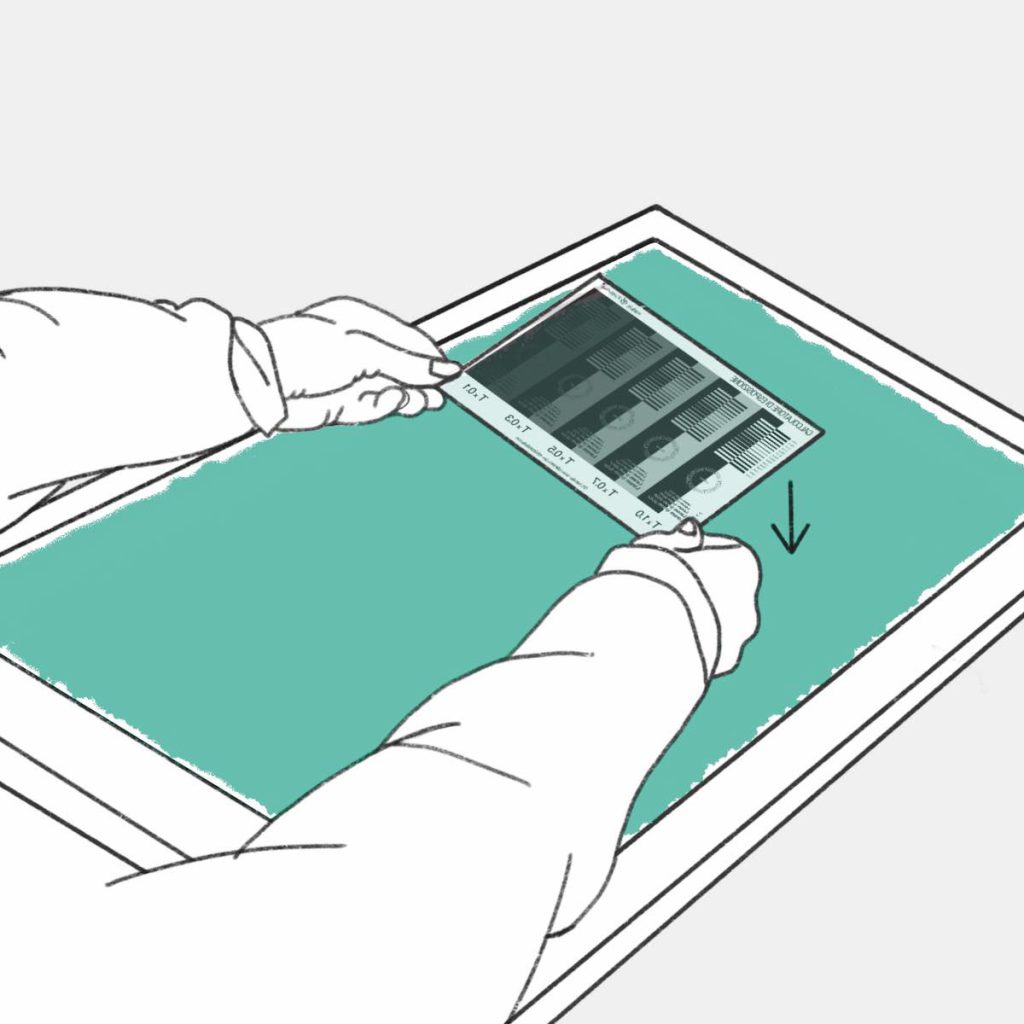
To determine the screen exposure times in one go, we recommend using an exposure calculator.
An exposure calculator is an indispensable tool for any screen printing workshop that produces screens. Moreover, it can be reused countless times.
It’s basically just a film that has different types of lines with different shades of grey printed on it. A number is indicated next to each line.
How to use an exposure calculator
Place the exposure calculator onto the mesh of an emulsified screen.
Now, guess what you think the correct exposure time should be for the screen (based on the instructions provided with the emulsion, or based on your experience), multiply it by 2, and then expose the screen to light. For example, if you think 8 minutes is the correct exposure time, expose the screen for 16 minutes.
Now develop the screen. Different areas on the exposure calculator, with different shades of grey, will react differently to the development: in some areas the emulsion will be completely washed away, in others it won’t come away at all.
Only a particular area will be perfectly developed. Make a note of the numbers indicated near that area: this is the coefficient by which you’ll have to multiply the exposure time you just used.
For example, if the number is 0.5, the correct exposure time for this screen under these operating conditions is 8 minutes (0.5 x 16).
Now clean the screen ready for reuse – using a stripper – emulsify it with the same emulsion used during the test, and then expose your “real” screen to the light. You should get the correct result on the first attempt, or at least without too much trial and error.
Conclusions and final tips
In order to get the perfect print, it’s necessary to calculate the correct exposure time. This is a time that’s calculated empirically, but there are things you can do to make the process more scientific and less random, so as to avoid lots of trial and error.
- Here’s how:
- consider all the potential variables and try to only change one at a time, taking note of the variations you observe
- if you want to speed the process up and obtain a more accurate result, use an exposure calculator
- you can find many different types of screen printing emulsion on our website, as well as all the instructions for using them properly.